
Chances are, you’ve heard quite a bit about Google Tag Manager (GTM) and may have even already tried using it…
….with a turbulent experience.
Say no more. Trust me, Google Tag Manager is about to become your new best friend.
This post is a “Complete Guide to Google Tag Manager” — you’ll get the why’s, what’s, and how’s of GTM.
In Part 1, you’ll learn…
- Know the 2 main parts of Google Tag Manager (and how they work together).
- Be able to setup your Google Tag Manager account and first container.
- Create your first few tags using triggers and variables.
In Part 2, we’ll dive a little deeper with…
- Advanced use cases of variables.
- How to use GTM and the “data layer” to report eCommerce transactions (sales) in Google Analytics.
In Part 3, we’ll get even deeper and show you…
- How to setup and use customer dimensions
- How to track users across devices
Let’s start with…
The Complete Guide to Google Tag Manager [Part 1]: Parts, Setup, and Creation
The “What” of Google Tag Manager
So what’s a “tag manager” anyway?
Tag managers were created to solve an enterprise level problem.
In the past, when someone in the marketing department wanted to put something as simple as a Facebook pixel on a page, they’d have to create a ticket and hand everything over to IT. Typically, IT — after a fairly lengthy process — would eventually get that pixel live on the site.
That’s a painfully slow way of doing things.
Tag managers were built to give the marketing team a way to update their site and, at the same time, free up the IT team to focus on more important projects… like that new cart design the boss wants.
Think of a tag manager as a “dashboard” that’s made for marketers so they can accomplish just about anything related to tracking their marketing results.
In 2012, Google announced their own tag manager and ever since “Google Tag Manager” has grown in both users and features.
Imagine being able to literally see every single click that happens on your site. With GTM, that’s not only possible, it’s deceptively easy to set up and I’ll show you how to do exactly that in just a bit.
Before we move on to the “Why’s” of Google Tag Manager, I want to address a popular question…
Does Google Tag Manager replace my Google Analytics?
Great question! And no… it doesn’t.
The two tools work together. In a very real way, GTM “supercharges” Google Analytics by giving it better, more specific data. Once that data is in there, the built-in reports that GA provides become that much more useful.
The “Why” of Google Tag Manager
This one is simple — Google Tag Manager gives you, as a marketer, a whole new level of tracking ability.
Once you know how, GTM makes it simple to place pixels and tracking scripts on your site, plus you’ll be able to completely customize the data that gets reported to Google Analytics (so you can get better insights).
GTM allows you to bypass your developer and makes it a ton easier to tag (pun intended) specific actions that your visitors are taking.
Anything from reporting Page views to specific button clicks.
Like any new tool, there’s a learning curve. But ultimately, GTM will save you a ton of time.
The “How” of Google Tag Manager: Tags & Triggers
We’re ready!
Lets dive into the different parts of Google Tag Manager and how to use them to start sending some data –like page views and link clicks — to Google Analytics.
There are two main parts to GTM:
- Tags – Tell GTM what you want it to do. For example, “Send a page view to Google Analytics.”
- Triggers – Tell GTM when you want it to fire a tag. For example, “Anytime someone visits a page.”
Before we see how these parts work together, let’s first create an account.
Fortunately, that process is fairly straightforward. Just visit the Google Tag Manager page and sign in. Follow the steps to create your first account and you’ll be asked to set up something called a “container”.
Typically, you’ll create a container for each website you’ll want to track.
Once you’ve created your account, and your first container, GTM will give you a snippet of code that looks like this:
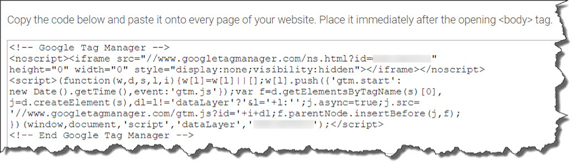
Just copy and paste this code so it’s right after the opening <body> tag of your site — many WordPress themes like OptimizePress 2.0 make this really easy to do.
If you are using a WordPress site, you can also use a plugin like DuracellTomi’s Google Tag Manager Plugin.
With GTM successfully installed, it’s time to create our first official tag!
For our first one, we’ll keep it simple. 🙂
Let’s tell Google Tag Manager we want it to report a Page view to Google Analytics every time someone visits one of our pages.
Here’s how to set that up…
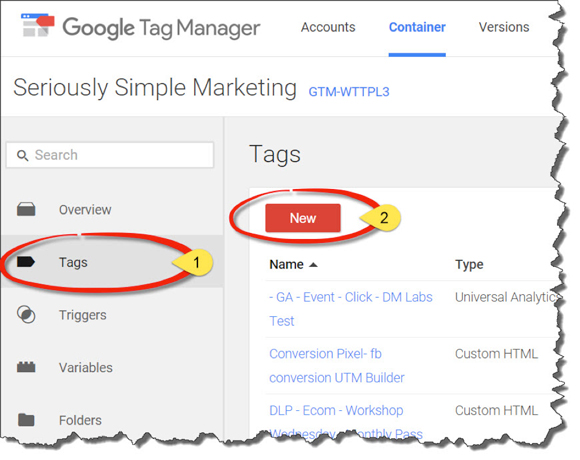
Tags & Triggers Step #1: Create a New Tag
Create a new tag by clicking on “Tags” on the left menu and then “New”.
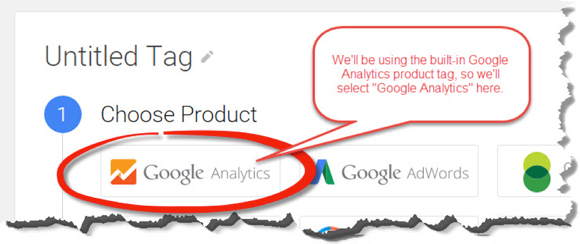
Google Tag Manager will then want to know which type of product you would like to create a tag for. Fortunately, Google Analytics is deeply integrated with GTM.
We’ll take advantage of this integration by selecting “Google Analytics.”
Tags & Triggers Step #2: Choose Your Analytics
From there, GTM will ask you if you want to use Universal or Classic Analytics. You’ll want to use Universal Analytics. It’s selected by default and is the newest version of GA.
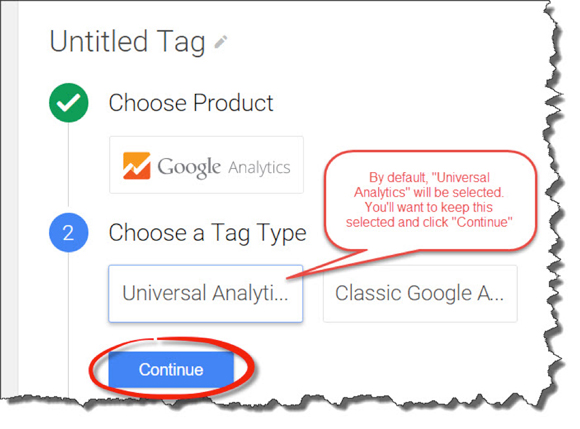
After you click “Continue” you’ll need to give GTM a little information about where it should send the Page view information.
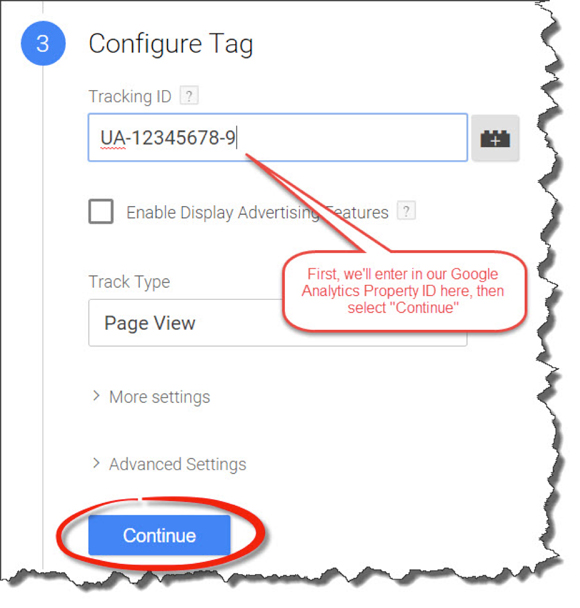
Tags & Triggers Step #3: Configure Your Tag
In this case, we’ll need to type in our Property ID. We’re using “UA-12345678-9” as an example here, but you’ll want to be sure to use your own.
(Wondering how to find yours? Follow these directions.)
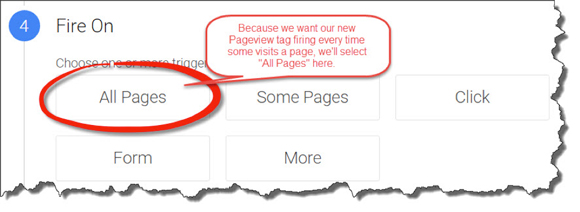
Tags & Triggers Step #4: Define Your Trigger
After clicking “Continue”, we’ll need to define the Trigger. Remember, the “trigger” is how we tell GTM when it should fire this particular tag.
In this case, we want it to report Page views whenever someone visits a page, so we’ll select “All Pages” from the list of built-in Triggers listed.
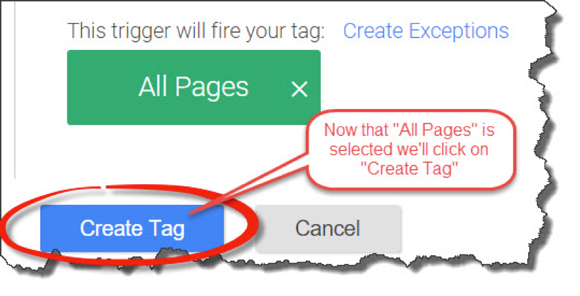
Tags & Triggers Step #5: Create & Name Your Tag
Once we’ve selected “All Pages”, we’ll click “Create Tag”.
Google Tag Manager will ask us for a name for our new Tag. We’ll call it “GA – Page view”.

Here’s a seriously simple tip… GTM will list out all of the tags in alphabetical order.
That’s why we’re starting this tag with “GA -” to make sure that all of our Google Analytics tags are grouped together and easier to find later.
Once our tag is named, we’ve got just one last step to complete…
Tags & Triggers Step #6: Publish Your Tag
Google Tag Manager won’t instantly push your changes live. Instead, just like when you create a WordPress post, you’ll need to “Publish” your changes before they become live.
In the upper right corner of your page, you’ll see how many changes are currently waiting to be published and the “Publish” button.
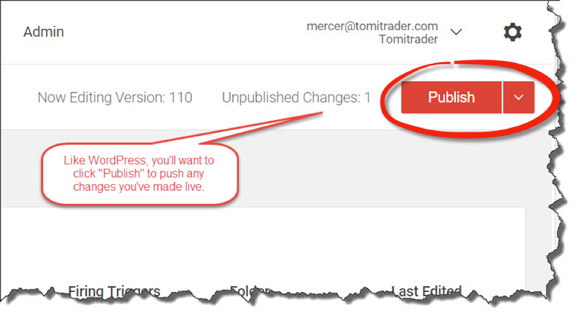
Once you click “Publish” your changes are live and your newly created Page view tag is officially passing data to Google Analytics!
One important note: Avoid duplicating your data.
If you use Google Tag Manager to control your Google Analytics (which I’d recommend), you’ll want to be sure you remove your existing Google Analytics tracking code from your pages. If you don’t, the traditional GA code will report & the new GTM Tag will report… and that’ll cause funky data.
No one likes funky data. 🙂
And there you have it. Your first tag, telling GTM to send a Page view to Google Analytics and your first trigger, telling GTM to send that Page view every time a page is loaded.
(NOTE: Want to become a Conversion Rate Optimization expert? Become an Optimization & Testing Specialist and get DigitalMarketer’s proven 8-step optimization process for turning existing traffic into more leads and more sales. Learn more here.)

The “How” of Google Tag Manager: Variables
Of course, there’s plenty more you can do with Google Tag Manager!
There’s another feature of GTM… they’re called “Variables”
- Variables – These are optional, and give GTM access to additional information it might need to complete what you’ve asked it to do so your triggers and tags can do more.
For example, “Use UA-12345678-9 as the Google Analytics Property ID.”
Remember how we told GTM which UA to use? It looked like this…

You’ll be setting up lots of Google Analytics tags, and it’s a pain to constantly have to look-up the UA all the time. Fortunately, you can create a variable.
We’ll call it “My UA Tracking ID” and assign it a value of “UA-12345678-9”.
Here’s how…
Variable Step #1: Create Your Variable
First, select “Variables”
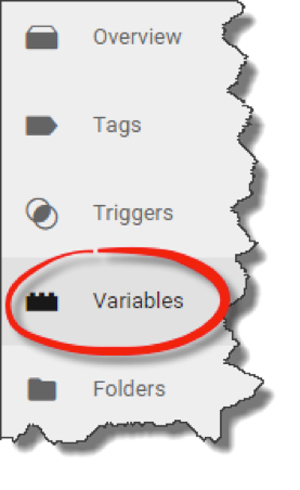
Once you’re on the “Variables” page, scroll down to the “User Defined Variables” section and click “New” to create your own variable.

Variable Step #2: Choose Your Variable Type
Next step, select which type of variable you want to create. For this example, we’ll select “Constant” since we want setup our new variable so that it has the same constant value each time it’s used.

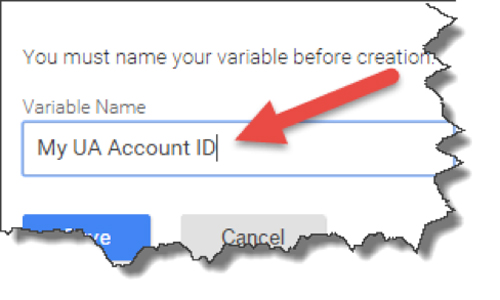
Variable Step #3: Assign Value & Name Your Variable
GTM will then ask you what value you want to assign to your new variable.

Once you create your new variable, you’ll want to name it and ‘Save’ it.
Variable Step #4: Adjust Your Previous Tag
Now that you’ve saved your new variable, let’s adjust our previous Page tag so it uses the variable instead of the us having to type in “UA-12345678-9” every time.
Select the “GA – Page view” tag you created earlier, and edit the details.
All you’ll need to do is find the UA # you had previously entered and delete it. Then, click the “lego block” icon and it’ll drop down a list of variable you can use (including the new one you just created).

Variable Step #5: Publish Your Variable
Now that you’ve changed the tag to use the variable, you’ll want to publish your changes. Once that’s done you’re updated tag will now automatically replace {{My UA Tracking ID}} with your UA.
Remember, you’ll want to replace “UA-12345678-9” with your actual Google Analytics property ID.
The “How” of Google Tag Manager: Tags, Triggers, & Variables
What else can you do with Google Tag Manger? Plenty.
How about setting up a tag that automagically (that’s definitely a word) tracks every time a visitor tracks on one of your links, and sends the details of the click to Google Analytics with the details of…
- what page they were on
- when they clicked
- what link they clicked on…
We’ll be using tags, triggers, and variables for this one.
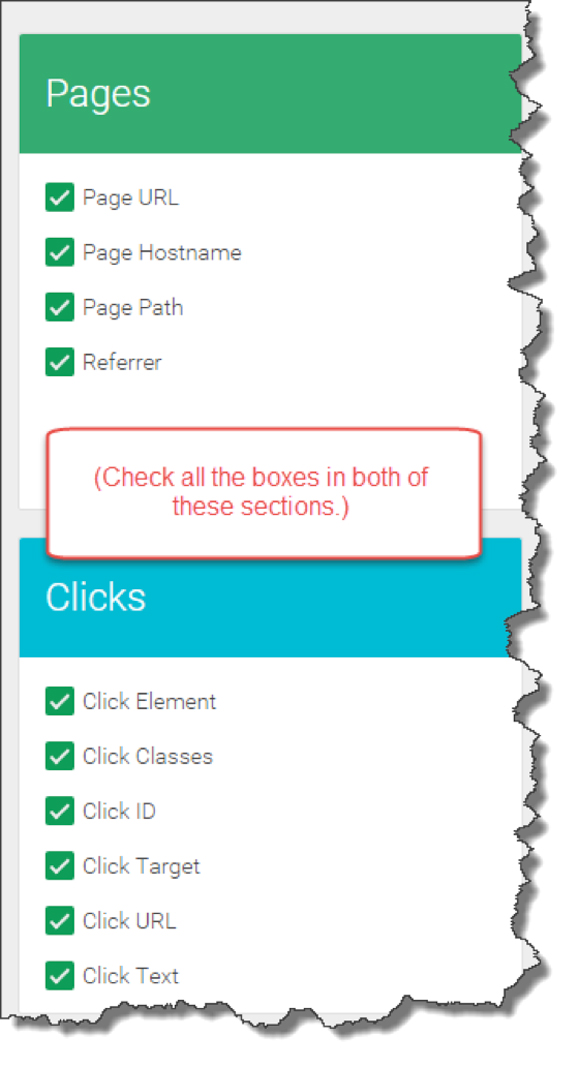
First, we’ll want to activate a few built-in variables so Google Tag Manager can automatically grab the details we’ll need.
Click on “Variables”…
… and select all the Clicks and Pages variables so it looks like this:
Now, let’s setup a tag that will…
- automatically track a link click,
- report to GA that a “Click” happened,
- send the URL of the page they were on when they clicked the link,
- send the URL of the link they clicked on.
Here’s what that tag looks like…
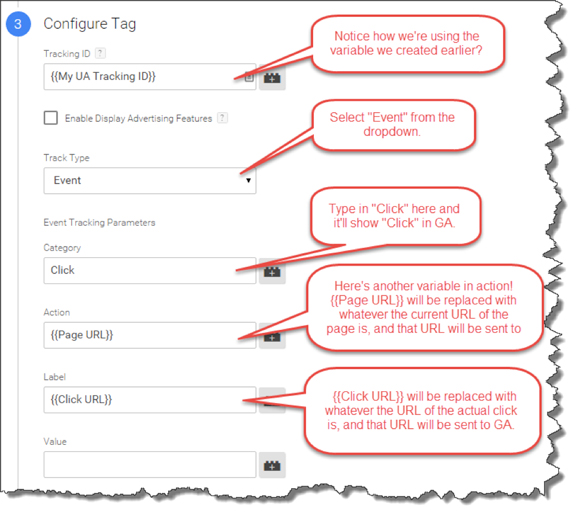
Now you have a tag that tells GTM to report an event to Google Analytics relaying a “Click” happened and then passes on the details of that click (including the page they were on and the actual URL of the click).
You’re using variables to automatically insert your GA Property ID, as well as both the Page and Click URLs of the click.
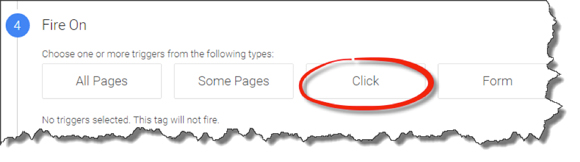
All that GTM needs now is to know when it’s supposed to report these details… It’s time for our trigger!

First, let’s start by selecting “Click”
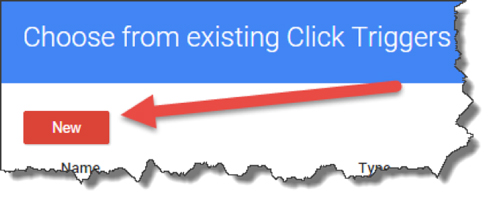
Select “New”.
Here’s how you’ll want to setup this trigger…
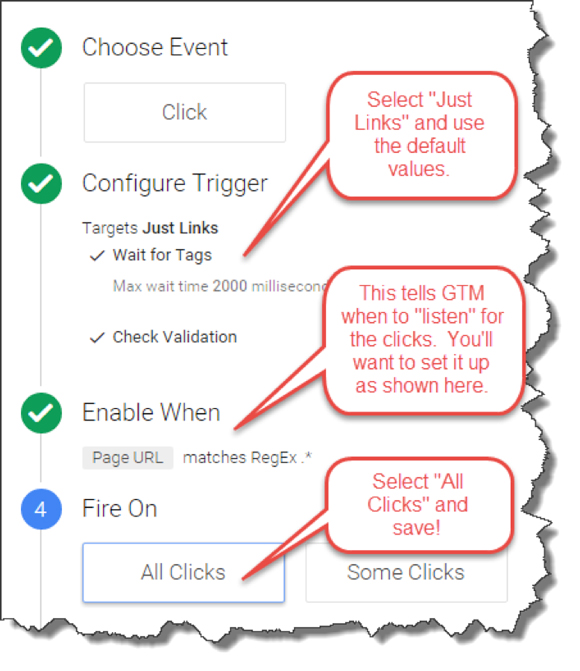
Once you’ve saved the trigger for your new tag, go ahead and publish the changes. Then you’ll be able to go into your Google Analytics and see your new events flowing through in your BEHAVIOR > EVENTS reports…

There is definitely a learning curve to Google Tag Manager.
It’s worth it.
Once you create your first tag, you’ll get a feel for how everything works.
Then move a little deeper and try something new, like creating your own variable.
From there, you can move into deeper waters with events.
Remember… one step at a time and no need to rush. If something isn’t making sense, there are lots of resources available to help you.
(NOTE: Want to become a Conversion Rate Optimization expert? Become an Optimization & Testing Specialist and get DigitalMarketer’s proven 8-step optimization process for turning existing traffic into more leads and more sales. Learn more here.)
The Complete Guide to Google Tag Manager [Part 2]: Advanced Variables and The “Data Layer”
So far, we’ve covered the 2 basic parts of Google Tag Manager (tags & triggers) and then moved into deeper waters with an overview of variables (along with some use cases).
Now it’s time to move a little more into the deep end of the pool!
Let’s setup a tag that will automatically report our product sales to Google Analytics (GA).
(RELATED: Applying Website Analytics to Your Digital Marketing)
To do that, we’ll cover some more advanced ways to use variables and dive into something called a “data layer.”
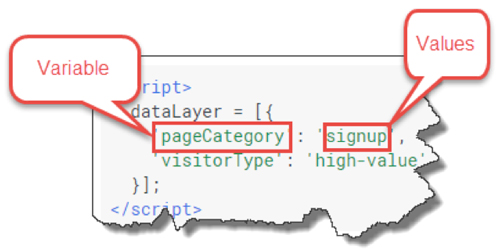
The data layer is just a snippet of code on your page that holds information. It’s like having a virtual filing cabinet loaded on every webpage.
All it does is hold variables and their values.
In this example, taken straight from Google’s Guide to Using Data Layers, there are 2 variables, “pageCategory” and “visitorType.” Each of those variables has a corresponding value.
In this case, “pageCategory” equals “signup” and “visitorType” equals “high-value.”
We’re going to use the data layer to assign values to variables. You can assign whatever value you like to a variable. But, if you want GA to report on those variables — you’ll need to use GA approved variables.
In other words, you need to speak their language.
In our case, we’re going to assign the values of an eCommerce transaction to variables needed to report that eCommerce transaction to GA.
The tricky part is figuring out how to get all that juicy eCommerce transaction data into the data layer!
The best way to do this is to involve your developer, and get them to make sure eCommerce is reporting to the data layer — you can give them this link, it’s all they’ll need to get started.
The Anatomy of Our eCommerce Tag
Working with a developer isn’t always an option and sometimes there are ways you can hack the system.
That’s what we did over at Seriously Simple Marketing.
We created a tag that automatically pulled values from parameters we passed through in the URL to build the data layer, and then we created another tag to tell GTM to report those details to GA so we could see them in the eCommerce reports.
In order to report our eCommerce we needed to create multiple tags.
Let’s go over the first tag.
The Data Layer Push
We call this a “Data Layer Push” because it “pushes” information into the data layer.
It’s a Custom HTML tag that looks like this:
Notice anything?
In this tag, the part where the actual values go are variables themselves.
Remember, in Google Tag Manager anything surrounded by {{ }} is a variable.
In this tag, the GTM variables we are using are called “URL” variables.
They work a little differently from the variable we setup earlier to replace your GA UA. That was a type of variable called a “Constant” variable. That means, whenever GTM sees that particular variable come across a tag, it’ll always replace it with the same “constant” value you defined when you set it up.
“Constant” variables work out perfectly for things like your GA UA (since that never changes), but when you start using different types of variables you can do even more with them.
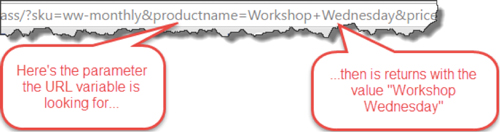
For example, “URL” variables are able to jump into the URL of the page your own and report back what they find. That’s exactly what we need since we pass the details of our transactions in the URL.
In this example, the variable we created (“Product Name”) looks in the URL for a parameter called “productname.” If it finds it, it returns back with the value of whatever “productname” equaled.
Here’s how the URL variable is setup in Google Tag Manager.
We first define that it’s a URL type of variable.
Then we need to get a little more specific and tell it what we want it to do in the URL “query.” The URL finds a certain parameter and once it does it reports back with the value of that parameter.
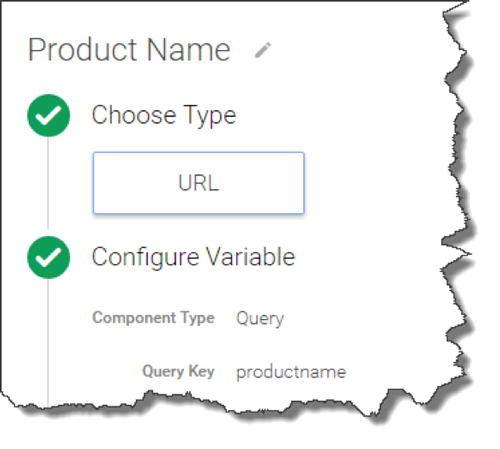
In the example above, we created a variable called “Product Name” to look in the URL (query the URL) to find a parameter called “productname.”
So how does this relate to reporting an eCommerce transaction?
eCommerce Google Analytic Reporting Requirements
To get eCommerce to report into GA, you first need the following required fields:
- transactionId (the order or invoice #)
- transactionTotal (the total dollar amount sold)
- sku (the sku of the product being sold)
- name (the name of the product sold)
- price (how much the product was sold for)
- quantity (how many products you sold)
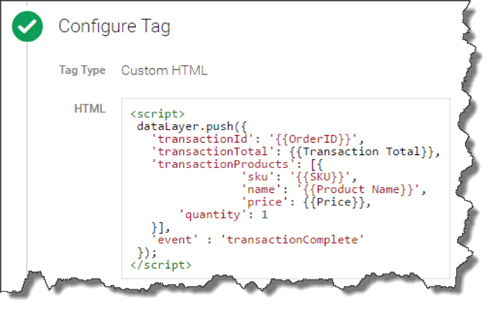
That’s why we created our Custom HTML tag to look like this:
<script>
dataLayer.push({
‘transactionId’: ‘{{OrderID}}’,
‘transactionTotal’: {{Transaction Total}},
‘transactionProducts’: [{
‘sku’: ‘{{SKU}}’,
‘name’: ‘{{Product Name}}’,
‘price’: {{Price}},
‘quantity’: 1
}],
‘event’ : ‘transactionComplete’
});
</script>
That way the data layer would contain all the required fields.
Then we created the following URL variables:
- OrderID
- Transaction Total
- SKU
- Product Name
- Price
As a side note, since we only sell one product at a time in our cart, we didn’t need a variable for quantity and just set it to “1” instead.
The next step was to be sure that the parameters we needed were passed through to our “Thank You” pages.
At Seriously Simple Marketing, we use Infusionsoft as our cart. There is an option in the order form setup to pass through the details of the transaction to the URL (in the form of parameters).
However, even though Infusionsoft will pass through the transaction ID, it doesn’t report back things like the product, the price, or the sku (all required fields for GA).
To compensate for this, we adjusted the order forms settings in Infusionsoft so instead of sending to a Thank You page URL that looked liked this:
seriouslysimplemarketing.com/thank-you/
It send to something that looks like this:
seriouslysimplemarketing.com/thank-you/?sku=ww-monthly productname=Workshop+Wednesday&price=39.99&transactionTotal=39.99
Infusionsoft then sends to the Thank You page with the parameters we need to report to eCommerce.
The only parameter we don’t have “hard coded” in the URL of the Thank You page is the transaction ID. Fortunately, Infusionsoft automatically adds that to the end of the URL as an additional parameter called “orderId.”
(NOTE: Want to become a Conversion Rate Optimization expert? Become an Optimization & Testing Specialist and get DigitalMarketer’s proven 8-step optimization process for turning existing traffic into more leads and more sales. Learn more here.)
Putting The Pieces Together
Now that we have all of our required details assigned to parameters in the URL, those URL Variables we created earlier go to work!
They jump into the URL, query it for whatever parameter they are assigned, and return with the value of that parameter.
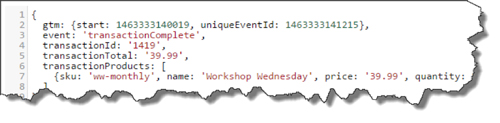
That’s how a tag that looks like this in GTM:

Makes the data layer look like this after it’s fired:
But when do we fire this tag?
In our case, we know that if the our URL Variable called “OrderID” contains some sort of value, it’s because Infusionsoft passed through it’s parameter (called “orderid”) in the URL along with the transaction ID. (In the example above, it said “orderid=1419” in the URL on the Thank You page after our purchase).
The trigger looks like this:
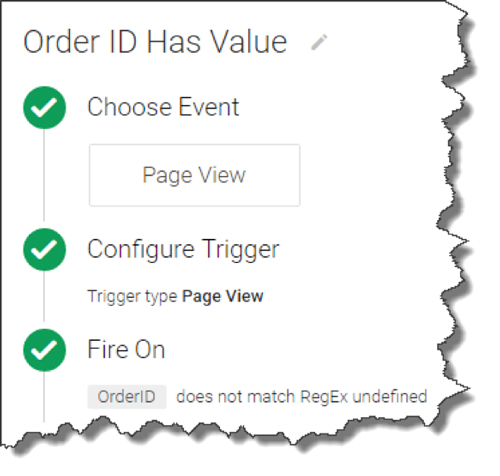
All it does is tell GTM to fire whenever URL Variable “OrderID” has some sort of value.
Just pushing that information in the data layer isn’t quite enough though. We need to tell Tag Manager that the data layer has been updated.
That’s what this part of the tag does…
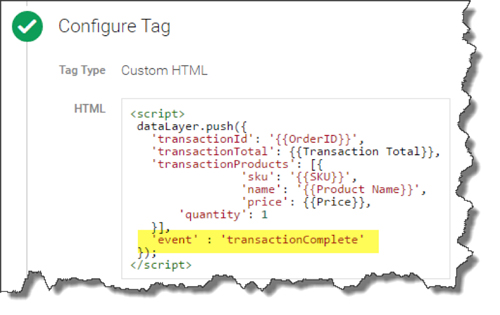
Here, we created an event called “transactionComplete.” Once that comes through, GTM knows the data layer has been changed and checks to see if it needs to do anything else.
In this case it does.
We need it to report the transaction details it has in the data layer to GA.
Here’s the tag that does that:
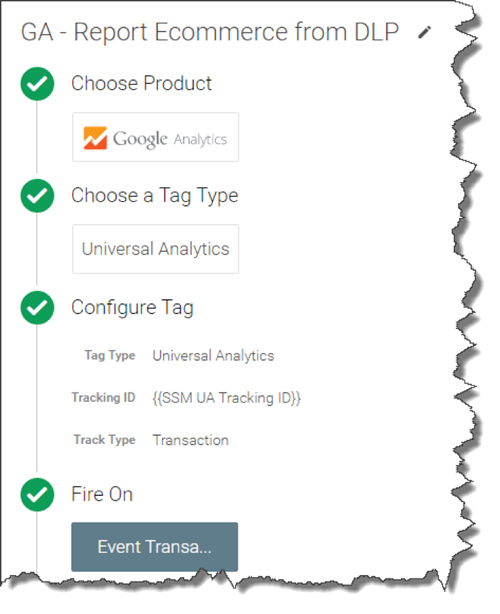
It’s a pretty simple setup. A GA tag that is a “Transaction” type.
The fun part on this one is the Trigger we used.
It’s a type of trigger called a “Custom Event” and it looks like this:
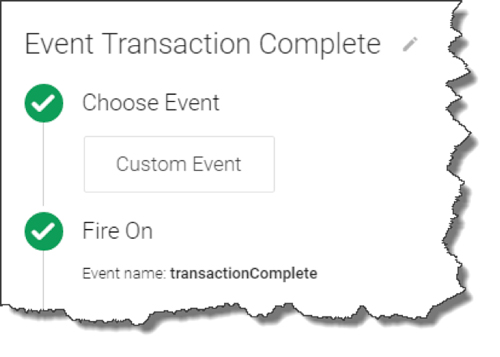
You can see that there isn’t much to it. All we’re doing here is telling GTM that this trigger should fire whenever it sees the custom event called “transactionComplete” come through.
At that point, it’ll report any eCommerce details it sees in the data layer directly to GA.
Let’s Recap
Let’s recap the entire process.
First, when someone purchases something, we have our cart send them to a Thank You page that has all the parameters we need to report an eCommerce transaction.
That URL might look something like this:
/thank-you/?productname=myproduct&price=297.00&sku=video-course&transactiontotal=297.00&orderid=12345
Then, we setup URL variables for each of the parameters we need.
“Product Name” queries for the “productname” parameter in the URL and returns back with “myproduct” as the value.
“Price” queries for the “price” parameter in the URL and returns back with “297.00” as its value.
And so on.
Next up, we fire the Custom HTML eCommerce tag whenever it sees that the “Order ID” variable has a value (since the only time it should have a value is when an actual transaction happened).
That pushes the details of the purchases into the data layer and reports a GTM “event” called “transactionComplete.”
Once GTM notices the event come across, it fires the transaction tag which jumps back into the data layer and reports the details of the transaction directly to GA.
One Size Doesn’t Fit All
Of course, this is just ONE way to use Google Tag Manager to report eCommerce transactions to GA.
Every cart reports eCommerce transactions differently. We used Infusionsoft as an example here, since we use it ourselves, but the techniques are pretty much the same with most carts.
You need to figure out how to get the information to the data layer. In our example, we passed the data through as parameters in the URL of the Thank You page and then grabbed those using GTM URL Variables to push the actual values in the data layer.
You may have to have your developer code something that does the same thing, or you may be able to take advantage of reporting what your eCommerce cart already provides.
Either way, once the details of the transaction are in the data layer, all you need to do is to fire the “Transaction” tag, and GTM will automatically report those details to GA so you can finally see what’s being purchased (and, more importantly, what traffic sources are leading to those purchases!).
Remember… one step at time and no need to rush. If something isn’t making sense, a quick Google search will reveal lots of resources available to help you.
The Ultimate Guide to Google Tag Manager [Part 3]: The Holy Grail of Tracking: User ID Tracking
Before we move on to this final part, let’s chat a bit about what Google Analytics counts as a “user”.
The very first time you visit a site that is using Google Analytics for tracking, GA checks to see if you’ve been there before. It does this by looking for certain cookies in your browser and, since in this example you’re visiting for the first time, GA won’t find any of those cookies.
It’ll then drop new cookies are your browser and record you as a “new user” in Google Analytics.
The next time you visit the site, GA will check and find there are cookies there from previous visits. When it finds those existing cookies, it just updates them and marks you down as a “returning user” in Google Analytics.
Now, here’s the rub…
What if you visit a new site in the morning using your laptop, and then visit the same site from your computer at work later in the day?
To Google Analytics, even though it’s technically two different visits by the same user, it’ll record as two different visits by two different users.
Why?
Because in the past, there hasn’t been a way to tell Google Analytics that the two devices are actually the same person.
That is until a couple of years ago, when Google Analytics released its “Universal Analytics” update and added the ability to track across devices by enabling a featured called “User-ID Tracking”.
In a nutshell, “User-ID Tracking” allows you to assign a unique identifier to each one of your users (people who you actually have some sort of relationship with) and then, use that same identifier to track their visits no matter what device they are using.
This is called “Cross-Device Tracking” and it’s the holy grail of tracking as it allows you to track your user as they switch from using their laptop, to their tablet, a smartphone and back again.
Here’s an example of the “Device Overlap” report that Google Analytics makes available once you have User-ID tracking setup:
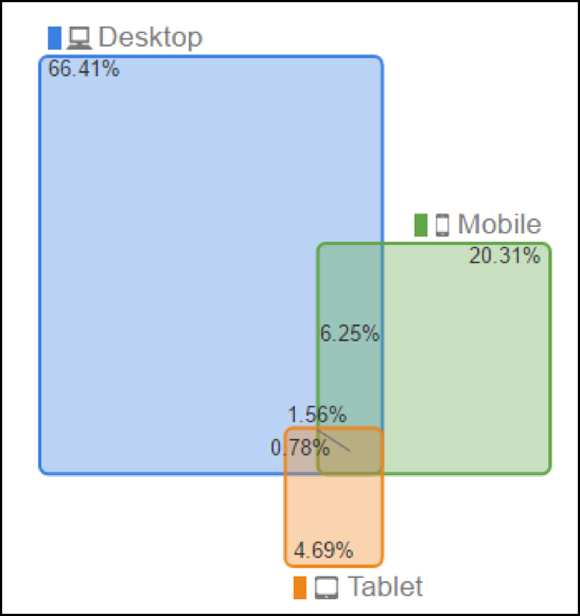
In this example, you can see that the majority of Seriously Simple Marketing’s traffic is from desktop and 6.25% of our users are accessing our site using a combination of both desktop and mobile devices.
User-ID Tracking Setup
User-ID tracking does take a bit of work to set up, but using Google Tag Manager can make the process a whole lot simpler.
What do you use for this “User-ID” identifier?
The trick to User-ID tracking is to pick something that is both unique to the user AND isn’t something that Google considers “Personally Identifiable Identification” (PII).
What’s an example of PII? Email addresses are a classic example.
Even though it may seem like using an email address as the User-ID is a good idea, Google considers email addresses to be PII so you can’t use them.
My suggestion? Look to your CRM.
As you saw from the ecommerce example earlier in this post, we use Infusionsoft… and Infusionsoft has something called a “Contact ID” that it assigns to every new user that engages with our company (either through opt-in or purchase).
We use Contact ID as the User-ID in Google Analytics and because the Infusionsoft “Contact ID” is just a number—and not something that Google can use to identify the user—it doesn’t count as PII.
REMEMBER: Google doesn’t care if you can use the User-ID to figure out who the user is, they only care that they can’t use whatever value you’re using to figure out who the user is.
User-ID Tracking Setup Step 1
Once you’ve determined what you’re going to use for the User-ID value, you’ll need to get it passed over to Google Analytics.
We’ll use Google Tag Manager to do just that AND we’ll do it the same way we passed ecommerce data over to Google Analytics.
First, get the User-ID value in the URL so we can set up a GTM URL variable to grab the value.
With Infusionsoft, this is pretty easy since we just check a box that passes through the contact data in the URL whenever someone opts-in or purchases a product.
Here’s an example of one of our “thank you” pages and what the URL looks like:
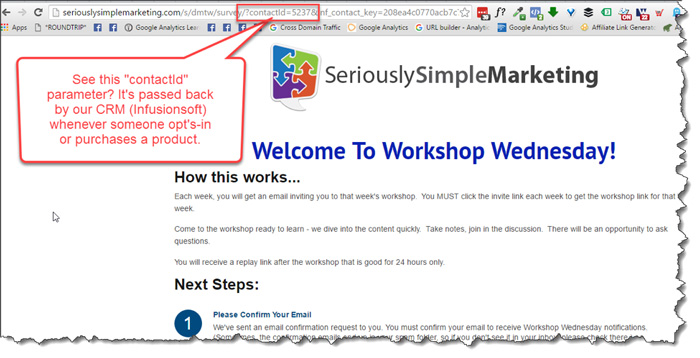
As you can see, there is a parameter in there called “contactId” and that’s what we’re going to tell Google Analytics to use as the “User-ID”.
User-ID Tracking Setup Step 2
We need to set the GTM URL variable to grab the value we need.
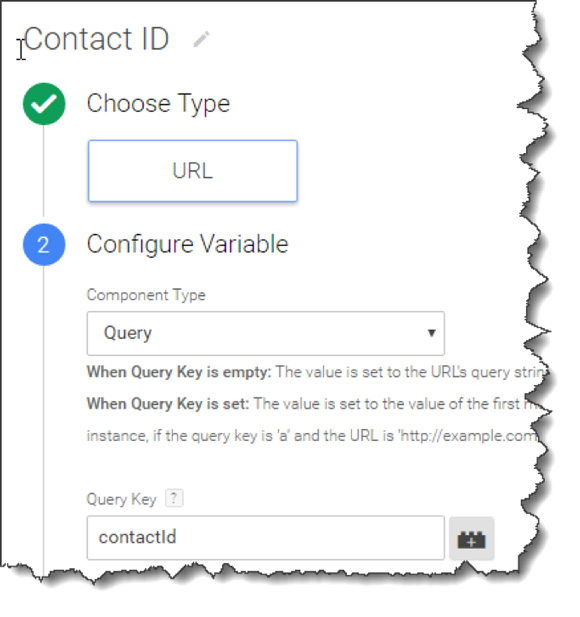
This is EXACTLY the same type of variable we used for ecommerce reporting earlier. This time, we’re telling GTM to look in the URL for the parameter called “contactId” and return with whatever value is there.
Once we have the value we need, it’s time to pass it to Google Analytics.
To do that, we’ll need to head over to Google Analytics and make sure it’s set up to receive and use the User-ID.
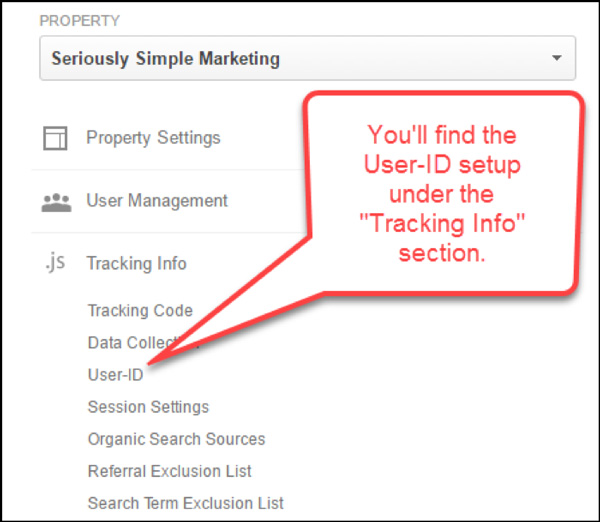
We’ll jump into the GA property and activate User-ID tracking here:
Once you begin your setup, you’ll see a spot to accept Google’s Terms on what you can and cannot track using the User-ID reporting function.
From there, you see that “Session Unification” has been turned on for you…
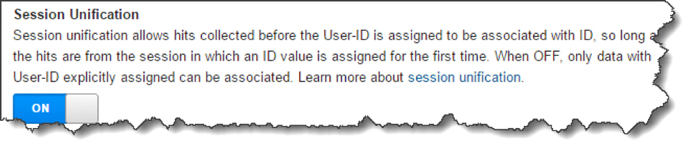
This is a nifty little feature that you’ll generally want to have turned on. Basically, this makes sure that any hits that were received before the User-ID was known are retroactively applied to that User-ID once it is known for the first time.
User-ID Tracking Setup Step 3
Finally, you’ll create the actual User-ID view here…
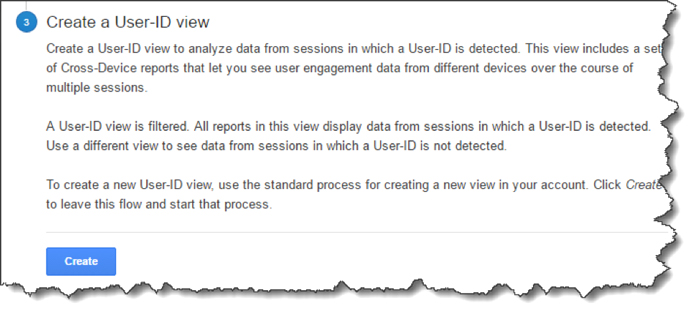
Why is the new view needed? Because User-ID views are unique and contain reports that are unique to these views.
For example, you’ll have the new User Explorer report:
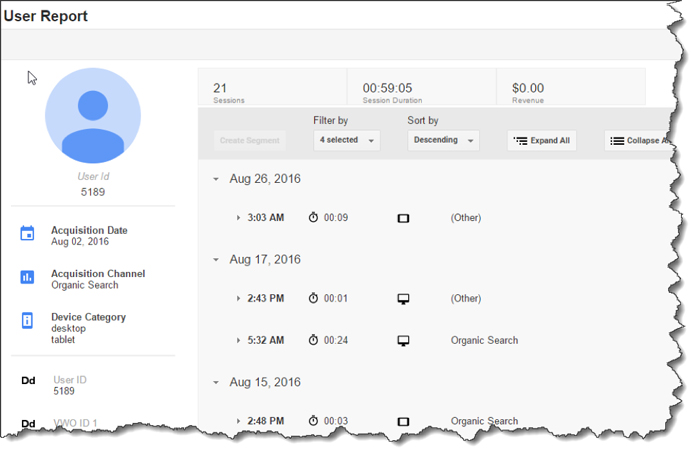
Here you can get detailed information about specific users.
You’ll also have access to Cross Device reports that’ll show you which devices your users are using and how they are using them (in what order).
Keep in mind, the User-ID views are only going to track sessions that have a User-ID associated to them, so they won’t contain the same amount of traffic as your other views (since they are tracking all sessions… even those without User-ID’s).
Now that we’ve got Google Analytics set up to receive User-ID’s and we’ve got Google Tag Manager collecting User-ID’s (via the URL Variable we created earlier), it’s time to send the User-ID over to GA using GTM.
To do that, we’ll be making one tiny tweak to our “Page View” tag (the same one you’ve already setup in GTM).
Just this part…
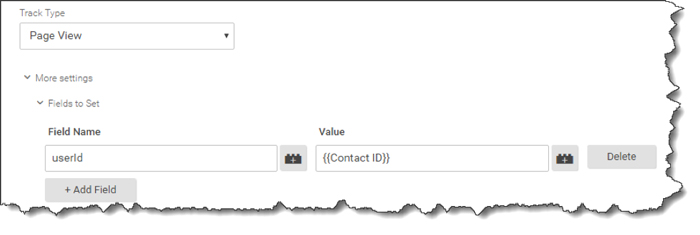
Click on “More Settings > Fields to Set” and then add a field called “userId” (you’ll see it pop up in the dropdown menu of available fields). Then enter in whatever variable you are using to collect your User-ID. We setup one called “Contact-ID” earlier, so we’ll be using that.
Publish your updated tag and that’s it! Google Tag Manager is now sending over User-ID information to Google Analytics and you’ll have a whole new level of data about your users.
Before we end this section, here’s a Pro Tip…
Google Tag Manager can only report the User-ID to Google Analytics if it knows the User-ID.
We already set up grabbing the User-ID from the URL, but that only works if the User-ID is in the URL.
We’ve set up our Infusionsoft to report that field in the URL whenever someone purchases a product or opts-in for an offer.
But what if they are visiting our site from an email we sent out afterward? Google Tag Manager won’t have a way to identify them as a user.
Fortunately, there is a simple way to remedy this. In our case, we just add a merge field to the links in our emails that pass through the Contact ID so it shows up in the URL. As long as that is there, GTM sees it and passes it through to GA.
Another cool technique for User-ID setup using Google Tag Manager can be found in this post by Simo Ahava. In it, he describes a technique that he uses to make sure the User-ID is associated with as many sessions as possible. It’s a bit more technical, but incredibly powerful.
As you can see, with Google Tag Manager you can set up everything from basic page view information, all the way to more advanced things like ecommerce and User-ID tracking.
As with all tools that have this much power, take it one step at a time. There is no need to rush. If something isn’t making sense, a quick Google search will reveal lots of resources available to help you!
(NOTE: Want to become a Conversion Rate Optimization expert? Become an Optimization & Testing Specialist and get DigitalMarketer’s proven 8-step optimization process for turning existing traffic into more leads and more sales. Learn more here.)